|
It is currently Fri Apr 19, 2024 1:41 am
|
View unanswered posts | View active topics
| Author |
Message |
|
Jlef1234
|
Post subject: 2016 PNP write up and adding vents  Posted: Posted: Tue Mar 29, 2016 12:43 pm |
|
 |
| Newbie |
Joined: Fri Feb 26, 2016 8:43 pm
Posts: 24
|
|
| Top |
|
 |
|
Jlef1234
|
Post subject: Re: 2016 PNP write up and adding vents Posted: Tue Mar 29, 2016 12:47 pm |
|
|
| Newbie |
Joined: Fri Feb 26, 2016 8:43 pm
Posts: 24
|
|
Here's more of the ballast set up
| Attachments: |
File comment: After the loop it comes around and down to fill the stock hard tank. It's fills through the middle connection. The far right is what attaches to the front of the PNP bag to fill and drain the bag. The far left is a small vent line for the hard tank that goes straight out a through hull fitting.
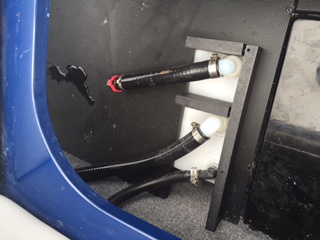
image.jpeg [ 42.73 KiB | Viewed 33866 times ]
|
|
|
| Top |
|
|
|
Jlef1234
|
Post subject: Re: 2016 PNP write up and adding vents Posted: Tue Mar 29, 2016 12:49 pm |
|
|
| Newbie |
Joined: Fri Feb 26, 2016 8:43 pm
Posts: 24
|
|
Here's what the rear looks like. The drain pump on the right. And the left hose goes to the rear of the PNP bag to fill and drain the bag.
| Attachments: |
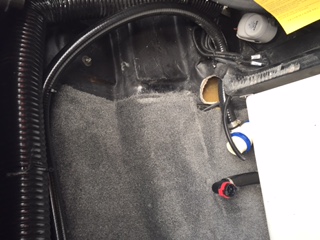
image.jpeg [ 44.26 KiB | Viewed 33862 times ]
|
|
|
| Top |
|
|
|
Jlef1234
|
Post subject: Re: 2016 PNP write up and adding vents Posted: Tue Mar 29, 2016 12:58 pm |
|
|
| Newbie |
Joined: Fri Feb 26, 2016 8:43 pm
Posts: 24
|
|
Here's the thru hull fittings. Looking from outside the boat the rear most port is the drain. The middle is a vent for the stock hard tank. And the furthest forward to the right is the bilge
| Attachments: |
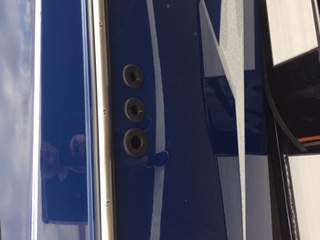
image.jpeg [ 33.25 KiB | Viewed 33857 times ]
|
File comment: Here's the thru hull fittings on the starboard side. This is taken while lying on my back looking up at it. The far right is the drain. Middle is the vent for the stock hard tank. And far left is the bilge.
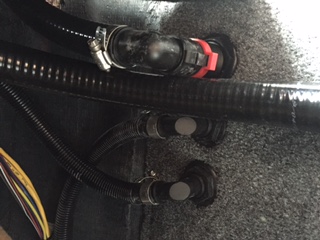
image.jpeg [ 44.85 KiB | Viewed 33857 times ]
|
Last edited by Jlef1234 on Tue Mar 29, 2016 1:30 pm, edited 1 time in total.
|
|
| Top |
|
|
|
Jlef1234
|
Post subject: Re: 2016 PNP write up and adding vents Posted: Tue Mar 29, 2016 1:07 pm |
|
|
| Newbie |
Joined: Fri Feb 26, 2016 8:43 pm
Posts: 24
|
|
| Top |
|
|
|
Jlef1234
|
Post subject: Re: 2016 PNP write up and adding vents Posted: Tue Mar 29, 2016 1:09 pm |
|
|
| Newbie |
Joined: Fri Feb 26, 2016 8:43 pm
Posts: 24
|
|
Use marine silicone and a hose clamp to attach the elbow to what is going to be new vent hose.
| Attachments: |
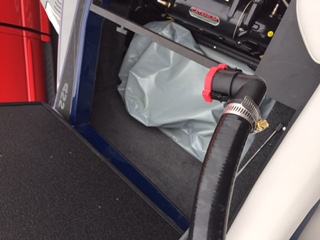
image.jpeg [ 45.92 KiB | Viewed 33848 times ]
|
|
|
| Top |
|
|
|
Jlef1234
|
Post subject: Re: 2016 PNP write up and adding vents Posted: Tue Mar 29, 2016 1:14 pm |
|
|
| Newbie |
Joined: Fri Feb 26, 2016 8:43 pm
Posts: 24
|
|
Measure out how much hose you will need and cut it with a pvc pipe cutter. Then attach a Wye. This one was bought from board stop. Use silicone and hose clamps. It's also a good idea to wrap all clamps with electrical tape so that they don't puncture the bag.
| Attachments: |
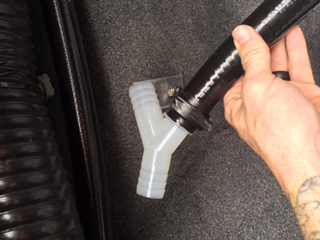
image.jpeg [ 48.75 KiB | Viewed 33846 times ]
|
|
|
| Top |
|
|
|
get_sum
|
Post subject: Re: 2016 PNP write up and adding vents Posted: Tue Mar 29, 2016 1:14 pm |
|
|
| Team Axis |
Joined: Fri Aug 17, 2012 1:18 pm
Posts: 435
Location: OKC
|
|
I'd also wrap the hose clamp with electrical tape to prevent accidental puncture or scrapes/cuts to your hands later on.
|
|
| Top |
|
|
|
Jlef1234
|
Post subject: Re: 2016 PNP write up and adding vents Posted: Tue Mar 29, 2016 1:18 pm |
|
|
| Newbie |
Joined: Fri Feb 26, 2016 8:43 pm
Posts: 24
|
|
Cut into the drain and attach he Wye in the same way that you did before.
| Attachments: |
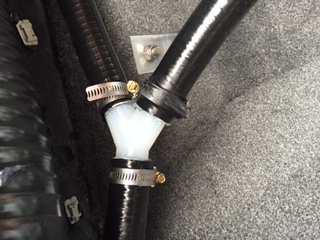
image.jpeg [ 54.83 KiB | Viewed 33844 times ]
|
|
|
| Top |
|
|
|
Jlef1234
|
Post subject: Re: 2016 PNP write up and adding vents Posted: Tue Mar 29, 2016 1:20 pm |
|
|
| Newbie |
Joined: Fri Feb 26, 2016 8:43 pm
Posts: 24
|
|
And that's it. Attach the Elbow to the straight fitting on top of the bag and you are done.
| Attachments: |
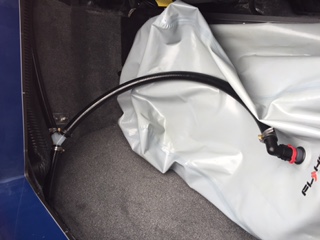
image.jpeg [ 38.39 KiB | Viewed 33843 times ]
|
|
|
| Top |
|
|
Who is online |
Users browsing this forum: No registered users and 62 guests |
|
You cannot post new topics in this forum
You cannot reply to topics in this forum
You cannot edit your posts in this forum
You cannot delete your posts in this forum
You cannot post attachments in this forum
|


